So you have a project on your local desktop and now you want to get these files up on github.com, here’s how you can do this.
Article summary
Create Remote Repository on GitHub.com
Download Git
- Download Installer
- Install git
- Check Git version
Create Local Repository
> git init
> git status
> git add .
> git commit -m “Custom message”
> git remote <remote url>
> git push -u origin <branch name>
DON'T drag your files directly into your github repo!
For those of you who saw me do this in my django beginners course, I’m sorry. At the time I didn't realize the issues this would cause. This may work in some cases but I noticed in projects with more files this tends to leave out files in the upload process, why? I have no idea, so even if it works, DON'T DO IT!
This won't be a full Git & Github tutorial, I’m gonna assume you get the point and just need to get your files up online. For a full overview I recommend you checkout this tutorial by my friend Brad Traversy.
So, Let's get started…
Create Remote Repository on GitGub.com
If you don't already have an account go ahead to github.com, signup, and create a repository, this is where our files will be added.
You can create your repository by going to “repositories” and by clicking “new”

In this example I will set my project to “private” and will not be creating a readme file. If you plan on sharing your project with the world make sure you leave it as “public”
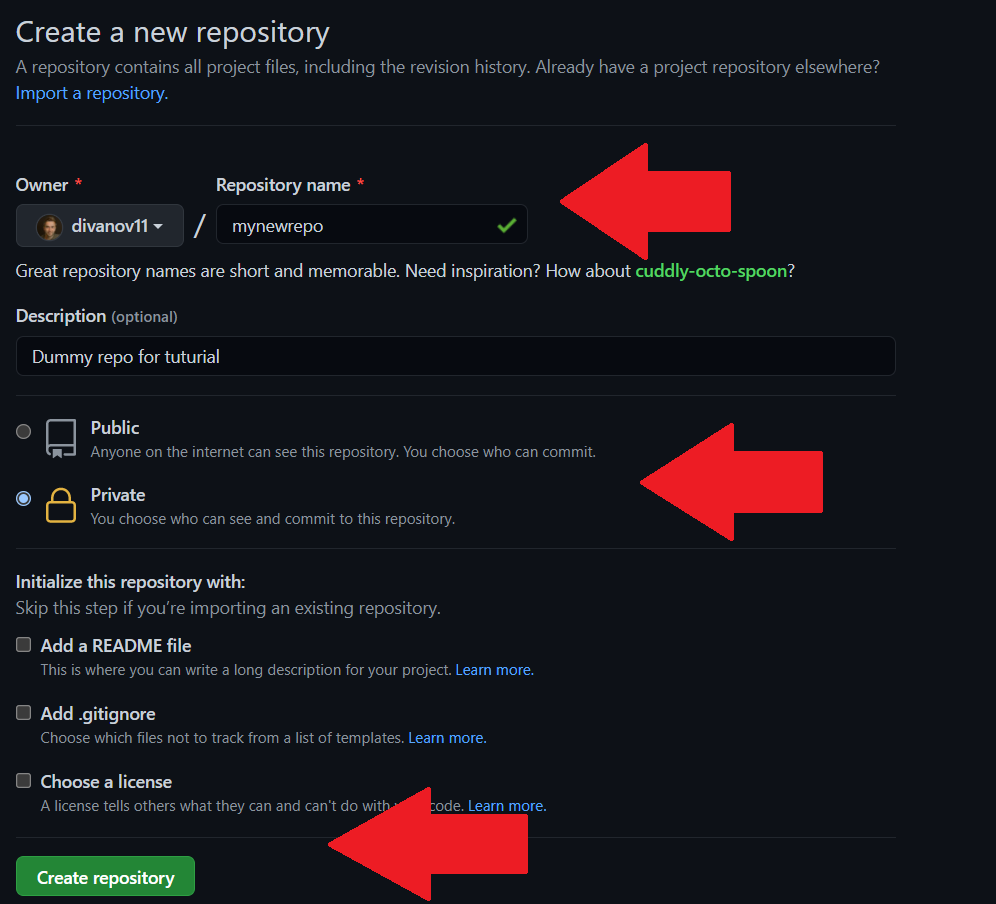
Once you create your repo you will see a quick start guide on how to commit frp, your local repository. We will ignore these instructions for now since we need to get set up locally first.
Download Git
Before we can get started we will need to download git locally in order to push files to github.
1 - Download Installer - Got to https://git-scm.com/ and select the downloader for your machine, I will be using windows

2 - Install git - Once the installer is downloaded go ahead and follow the steps to get things set up, I tend to just leave the default settings so if you don't have a preference just let it guide you.

3 - Check git version
> git --version
Once things are installed do a quick search on your computer for git bash and open it. To check the version of git you have installed go ahead and type git --version

You can also do this from your command prompt, in fact I will be using the command prompt from now on so go ahead and close git bash and open up a new terminal.If you already had your terminal open you may need to close and reopen to get the updates.

Let's look at a few of the commands we will be using in the next steps:
git init- Initialize local a new repositorygit status-shows what you have in you staging areagit add <file>- adds files and folders to the staging area- git commit - commits files in staging area to local repository
- git push - Takes a local repository and pushes to a remote - - repository (Github).
- Create a repo on github
- set a remote
- Add your github credentials
git pull- Pull latest changes from remote repositorygit clone- Clone repo from github
Create Local Repository
1 - Initialize new git repo
git init
Now that you have git installed, cd into your project folder and initialize a local repo.
cd projectname
git init
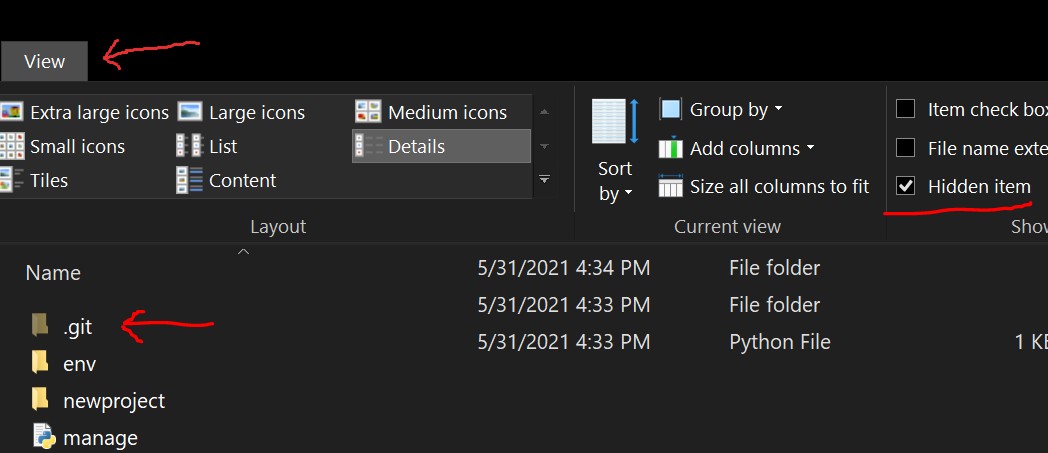
When you run git init a new folder will be added to your project files, these files visibility are set to “hidden” by default so you will not see them but rest assured they are there. If you want to see these files open up your folder and select “view”
2 - Check your staging area
> git status
This step is not necessary before we add our files but for the sake of seeing the difference and showing exactly what happens lets run “git status”

3 - Add files
> git add .
To add a particular file or folder to your staging area you can run “git add <filename>”. In our case we want to add all the files highlighted in red so lets run git add .. In case you can't see it there is a period after add indicating we want ALL the files.
After running git status I typically like to run git status again to ensure all changes we made.

What if we make changes after adding running git “add .”?
No worries, just run git add again and changes will be updated. You can always run “git status” beforehand to see exactly which files have been modified.
4 - Commit Changes
> git commit -m “Your custom note”
Now that we added files to our staging area we need to commit them to our local repository.
git commit -m “first commit”.

Files are now committed and ready to be pushed to our remote
5 - Set remote
> git remote add origin <repo url>
Now that all the files are set locally we are ready to push them to our remote repository. We set the remote so when we run git push, git knows which remote repo to send these files to.
Ex:
> git remote add origin https://github.com/dennisivy/newproject.git
6 - Push to remote
> git push -u origin <branch name>
Now that we have our remote set, we can push our local github repo live. The default branch on github is called “master” unless you set your own. When you first create a repository on github you will see steps to rename this branch to “main”, if you decided to rename the default branch then use that name instead of master.
git push -u origin master

Now if you refresh your repository on github.com you should see all your local files here.

Ignore files & cloning repos
Ignoring files: Add a .gitignore file and write in the file or folder name you want to ignore.
Clone a repo: copy the url of the repo you want to clone and simply run git clone <repo url>